My project is the automatic object detect and pickingup robotic arm. In this project, I’m able to make a website for users to decide which object to pickup and to control the arm when necessary. When using my project, users could click on the object in the website and then the arm would turn to the object selected so that it’s easier for users to pick it up.
| Engineer | School | Area of Interest | Grade |
|---|---|---|---|
| Qiyuan L | Novi High School | Computer Science | Incoming Junior |
Final Milestone
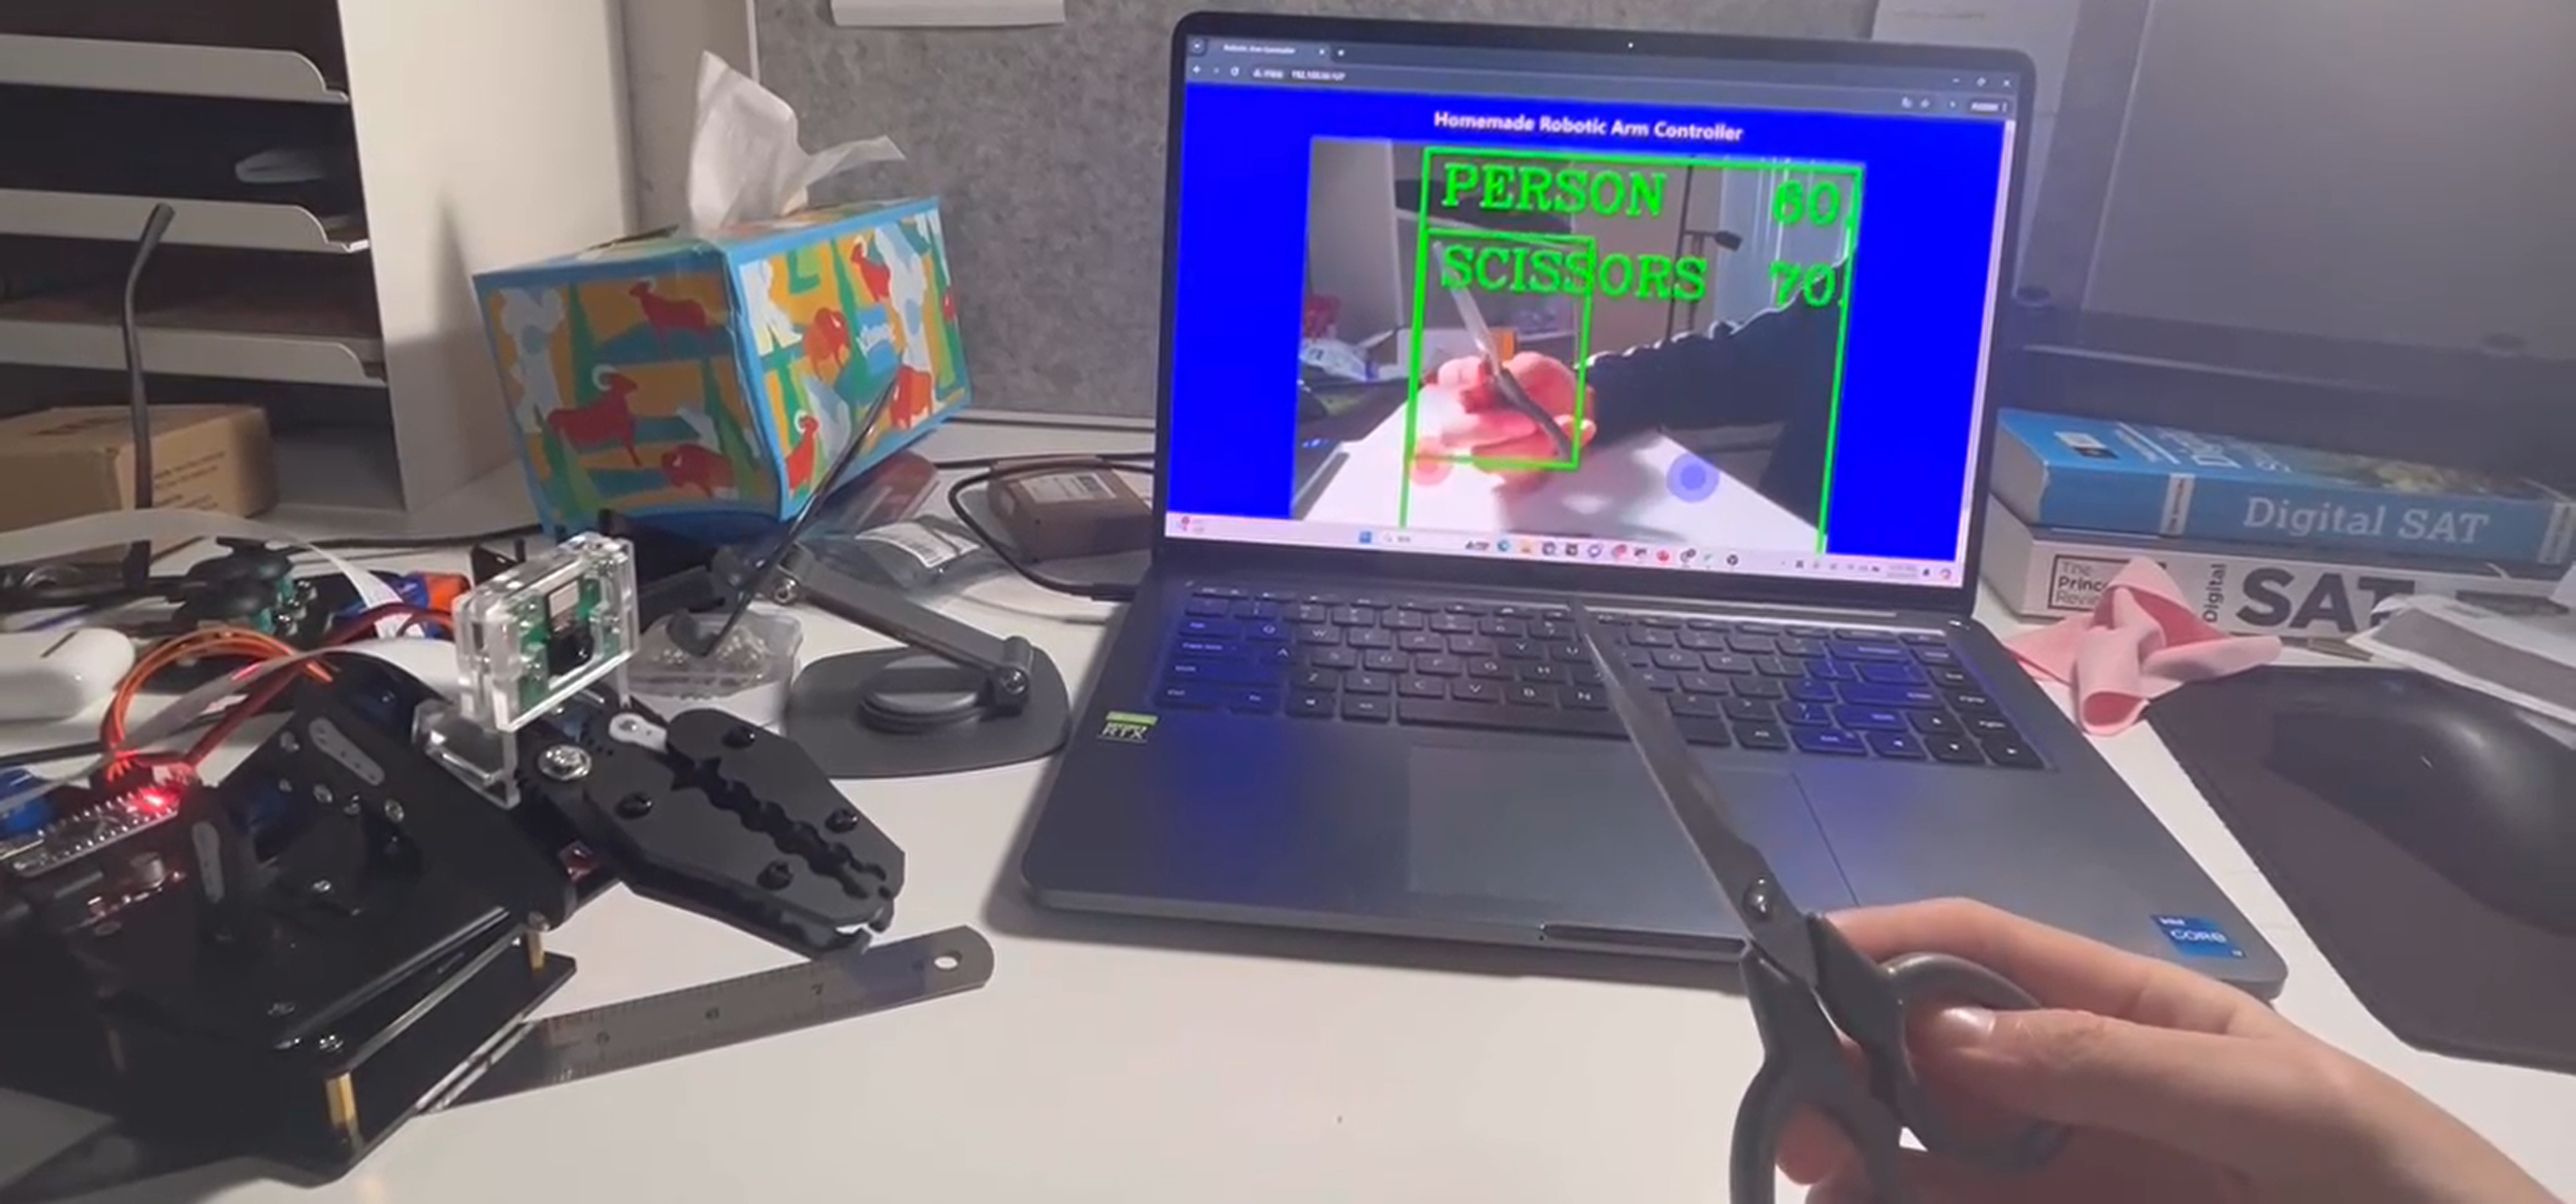
For the final milestone of my project, I successfully integrated the object detection function into the arm control system. I also programmed a useful feature based on this detection: when users click on any objects boxed on my camera video, the robotic arm moves towards the selected object.
I started by researching and deciding to use object detection from the OpenCV library. The process begins with capturing the camera image from the Pi camera and feeding it into the object detection model. The model draws boxes around each detected object so that users can clearly see them. I used JavaScript to identify the position of the mouse whenever it clicks. The data regarding the mouse’s position and the position of the objects is then shared. I created another Python thread to control the robotic arm based on the data shared from the website. This control thread calculates the horizontal and vertical angles needed to rotate the arm to center the selected object in the camera’s view, based on the camera’s field of view and the coordinates of the ideal point. The calculated commands are sent to the arm, which is accurately controlled by adjusting the servo’s rotation duration.
At this stage, my main task is configuring different rotation durations for various angles. I need to test different durations and check how far the object strays from the center each time to determine the most accurate rotation time for the servo.
The most valuable experience for me at Bluestamp was working as a full-stack programmer for the first time. I learned front-end website design and interactive programming, as well as back-end arm control coding. This greatly improved my programming skills and my ability to manage my time across different tasks. I am extremely grateful for this experience and have realized how enjoyable it is to complete such a significant project independently. I plan to continue pursuing programming in all its aspects and hope to complete more projects like this in the future.
Second Milestone
For the second milestone of the project, I successfully integrated a Raspberry Pi with an Arduino board which controls a robotic arm. This setup also includes configuring a Pi camera and establishing a web-based arm controller. The website features real-time imaging from the camera and incorporates two virtual joysticks that facilitate wireless control of the arm.
To facilitate communication between the Raspberry Pi and the Arduino, I utilized a USB cable, enabling data transfer between the two devices. The control data for the joysticks is encoded into a 16-character string simulating the data range of the real joystick data: left vertical, left horizontal, right vertical, and right horizontal. The website, built using the Python Flask framework due to its compatibility with various code modules, streams video using the Picamera2 library, with modifications based on a GitHub Picamera project. Additionally, I integrated two virtual joysticks into the website using the nibblejs library, a Node.js library that supports joystick functionality on web pages. User interactions with the joysticks update the joystick data in the website’s database in real-time. A separate Python thread reads this data, converts it into the required 16-character format, and sends it to the Arduino, which then controls the robotic arm based on this input.
During this phase, I encountered several challenges. Initially, I struggled with understanding how Arduino handles serial data reception. After extensive research and consultation of Arduino’s API documentation, I managed to configure the Arduino to receive data of a specific length from the Raspberry Pi. Another issue was ensuring that the joystick data from the web program was effectively shared with the Raspberry Pi’s data transmission script. This was resolved by implementing a shared database accessible by both programs, simplifying the data-sharing process. Lastly, I observed that data occasionally got mixed up during transmission, likely because the Arduino couldn’t process the incoming data quickly enough. To address this, I introduced a delay of 0.01 seconds between sending data batches, which stabilized the communication.
With the arm now controllable remotely and the camera functional, the next step involves fully integrating the camera into the arm control system. I plan to add an object detection module to the Raspberry Pi and program the arm to move towards objects it recognizes, aiming to automate the process of picking up specified items.
First Milestone
For my first milestone, I successfully assembled the robotic arm and tested all the electrical components, including servos and joysticks. I also managed to control the arm using a joystick. The robotic arm consists of 4 servos, several bearings, and is controlled by an Arduino Nano board. Although I encountered some challenges during the process, I resolved them by reviewing the source code and experimenting with different configurations.
The Arduino board is crucial to the functionality of the robot. It processes signals from the joystick and sends commands to the robotic arm based on these inputs. When activated, the Arduino waits for joystick movements. Moving the joystick sends a signal to the Arduino, which then calculates the necessary adjustments to the servos, allowing the arm to move to the desired position.
During the build, I faced a significant issue where the arm began moving erratically and would return to its original position, even though it had previously been functioning correctly. Initially, I suspected a misconfiguration of the servos. However, after checking the code and monitoring the servo angles by printing out servo angle data in the arduino monitor, the data in the Arduino matched the actual angles. Which means that it’s not the problem of mis configuration. I then observed that the arm functioned correctly when connected to a computer but not when powered by a battery. This led me to believe that the issue was related to insufficient battery voltage. Replacing the battery resolved the problem. In retrospect, I realized that the prolonged connection between the arm and the battery had likely depleted the battery’s charge.
Next, I plan to integrate a Raspberry Pi with the Arduino to handle tasks requiring higher computational power, while the Arduino will continue controlling the mechanical components. I will also implement object recognition software on the Raspberry Pi. Ultimately, I aim to combine control of the robotic arm with object recognition to enable automatic object pickup by the arm.
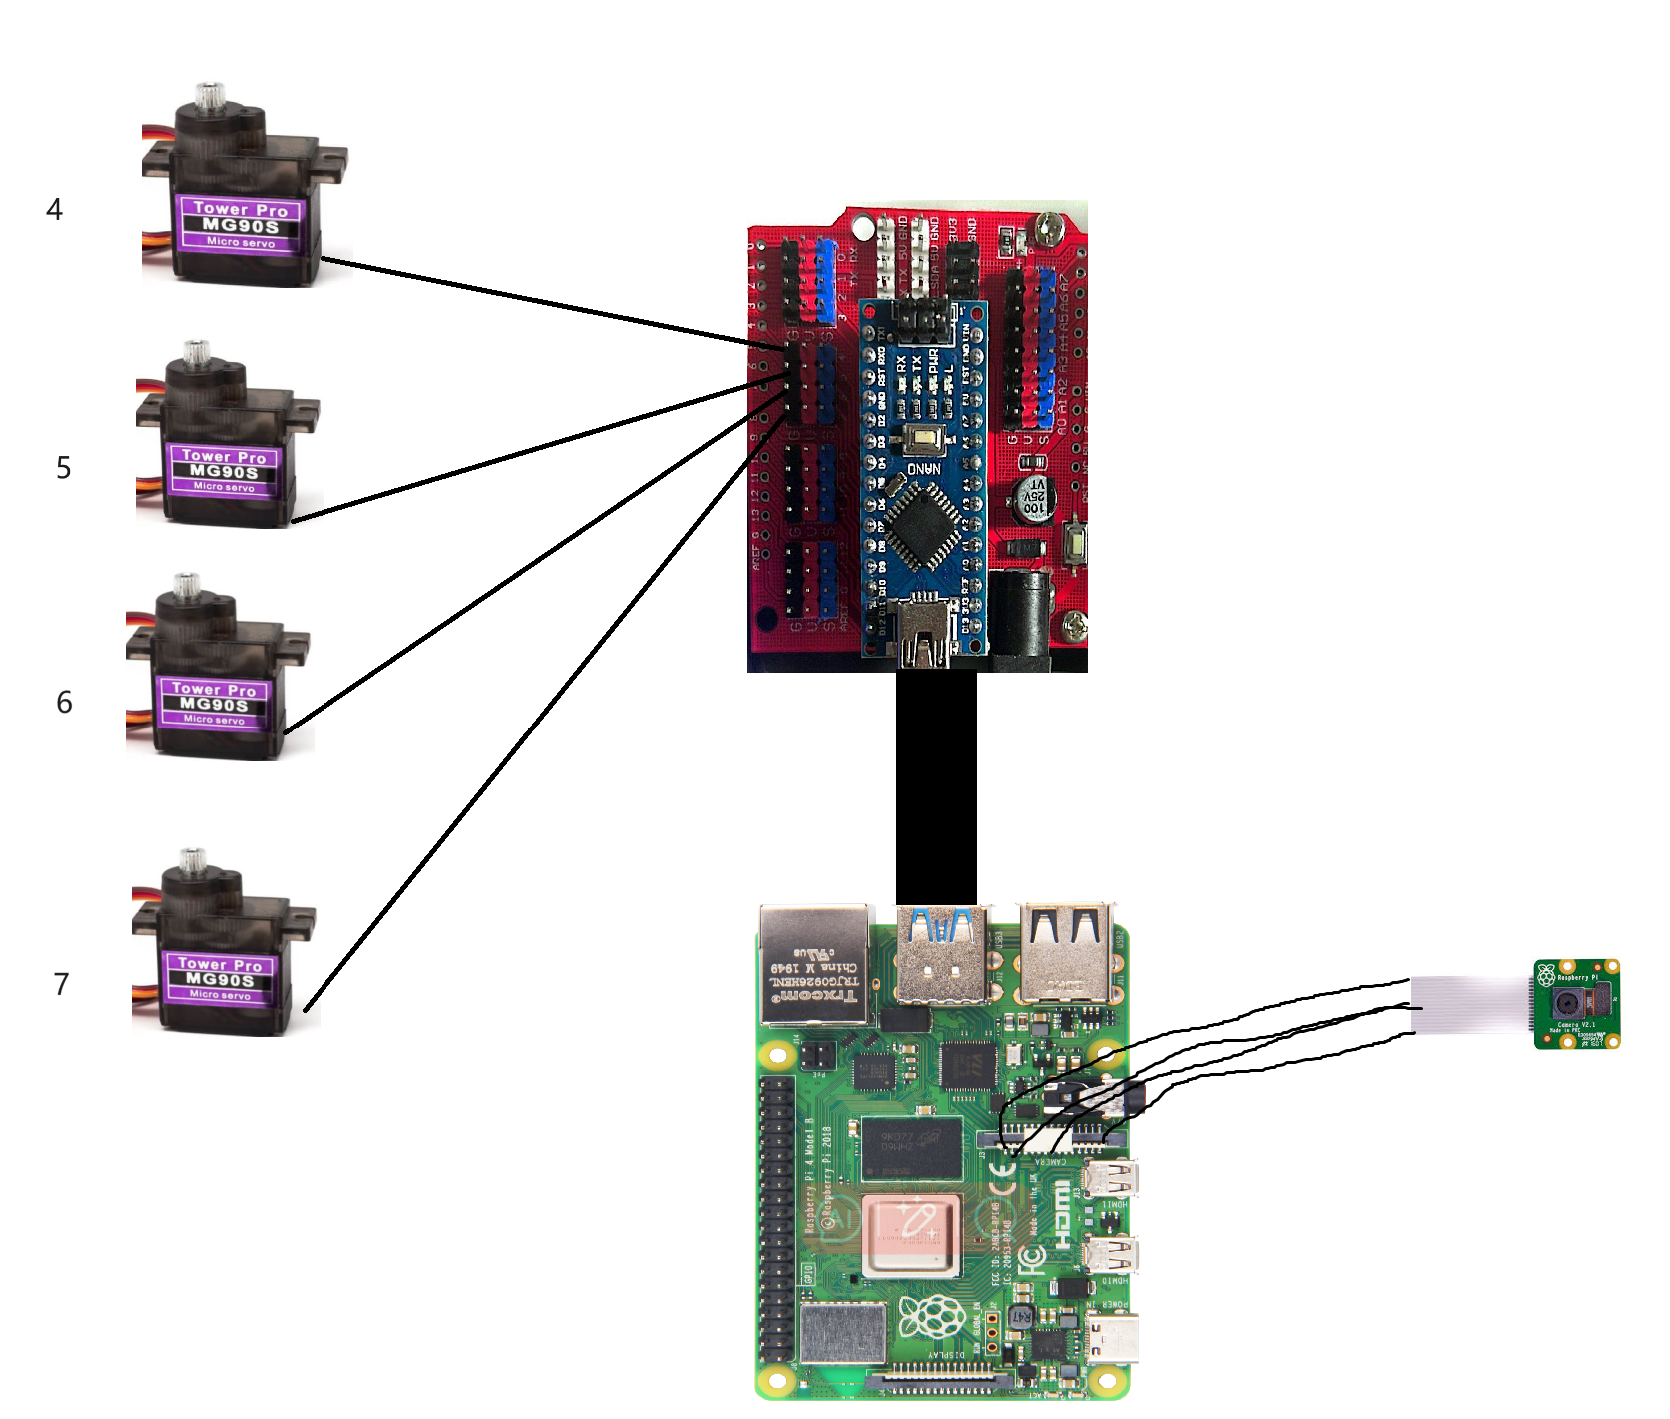
Schematics
Code
Here’s the code for the controlling part of the arm
Here’s the code for the website on raspberry pi and the auto moving part
Bill of Materials
Here’s all the part I used in the project.
| Part | Note | Price | Link |
|---|---|---|---|
| Robotic Arm Kit | the main structure of the project | $49.99 | Link |
| Servo Shield | control the servo in the arm | $10.99 | Link |
| Screwdriver Kit | assembling the arm | $6.99 | Link |
| Electronics Kit | What the item is used for | $13.99 | Link |
| 9V barrel jack | What the item is used for | $5.99 | Link |
| DMM | What the item is used for | $12.99 | Link |
| 9V batteries | providing power | around $7 | Link |
| power banks | providing power | $15.99 | Link |
| pi camera | providing vision | $8.99 | Link |
| pi camera cable | connect the camera and the pi | $5.49 | Link |
| raspberry pi | to process the image data and control the arm | $93 | Link |